Maintenance Guide
How to Repair Grasscloth Wallpaper
Torn fibers, lifting seams, stains and pet damage — natural wallcovering repairs require specific techniques that differ completely from standard wallpaper fixes. Here's how to handle each type of damage.
Key Takeaways
- Keep spare material from the same dye lot — replacement rolls may not match.
- Never use water on stains — moisture spreads stains and can dissolve natural dyes.
- Lifting seams: Apply seam adhesive with an artist's brush, never squeeze the tube directly.
- Tears: Cut patches along the weave lines (not straight edges) for invisible repairs.
- Adhesive on the face is permanent — if paste touches fibers, blot immediately with a dry cloth.
- Dry-cleaning sponge is the safest cleaning tool for natural wallcovering.
- When in doubt, call a professional — amateur repair attempts often make damage worse.
What Types of Damage Can Be Repaired?
| Damage Type | Repairability | DIY? | Technique |
|---|---|---|---|
| Lifting seams | Easy | Yes | Seam adhesive + artist's brush |
| Lifting edges | Easy | Yes | Seam adhesive + soft roller |
| Small tears (<5 cm) | Moderate | Experienced only | Splice patch along weave lines |
| Large tears / pet damage | Moderate | Professional recommended | Full panel replacement or large patch |
| Surface dust / soot | Easy | Yes | Dry-cleaning sponge or soft vacuum |
| Water stains | Difficult | No | May be permanent — professional assessment |
| Adhesive stains | Usually permanent | No | Panel replacement if visible |
| Fading / sun damage | Not repairable | No | Panel replacement with UV-matched material |
How Do You Fix Lifting Seams?
Lifting seams are the most common grasscloth repair and the easiest to fix yourself. They're usually caused by humidity fluctuations or aging adhesive.
- Lift the loose edge gently — don't force it; you'll tear the fibers
- Apply seam adhesive using a small artist's brush or thin palette knife — never squeeze adhesive directly from the tube (it deposits too much)
- Keep adhesive off the face — any paste on the fiber surface will leave a visible shiny spot
- Press the seam back down with a clean, soft cloth or wallcovering brush
- Wipe excess immediately with a barely-damp cloth — within 30 seconds, before it dries
- Hold in place for 60 seconds until the adhesive grabs
Pro tip: Use a clear seam adhesive (not white or yellow PVA glue). Clear adhesive is less visible if any accidentally contacts the fiber face.
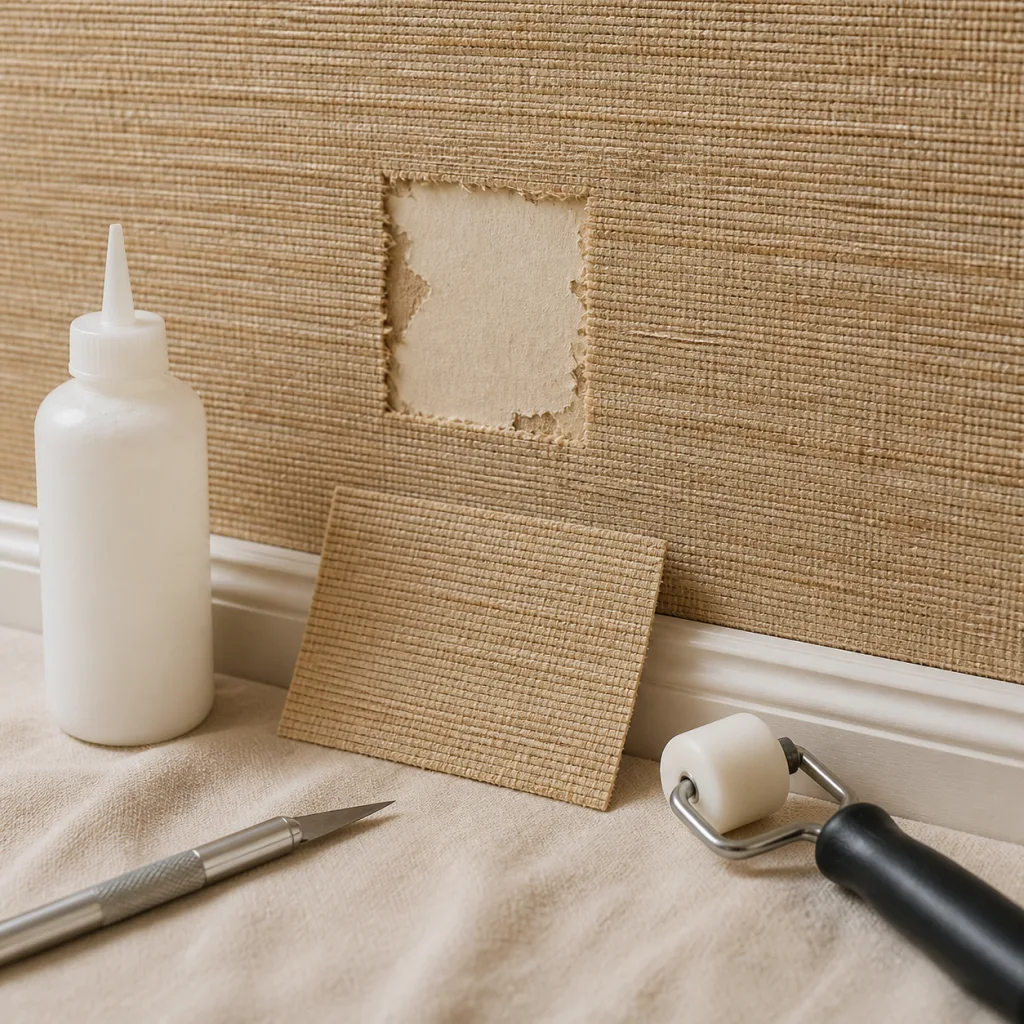
How Do You Patch Torn Grasscloth?
Patching a tear requires matching material from the same dye lot. This is why we always recommend keeping spare material after installation.
- Cut the patch — using a sharp blade, cut a piece from your spare material that's slightly larger than the damaged area. Cut along the horizontal weave lines (not in a straight geometric shape). This makes the patch edges blend with the existing texture.
- Position the patch over the damage — align the weave direction with the existing wallcovering
- Double-cut technique: Using a sharp blade and metal straightedge, cut through both the patch and the existing wallcovering simultaneously. This creates a perfect-fit seam.
- Remove the damaged section — peel away the cut-out portion of the old wallcovering carefully. Leave the paper backing on the wall if possible.
- Apply adhesive to the wall (not the patch) using a small brush
- Set the patch in place — press gently with a soft cloth, working from center to edges
- Clean any adhesive squeeze-out immediately with a barely-damp cloth
Color matching note: Even material from the same dye lot may appear slightly different if the existing wallcovering has aged or faded. Test-fit the patch dry before applying adhesive to check the color match. If the difference is noticeable, consider replacing the entire strip instead.
How Do You Clean Stains from Grasscloth?
Rule #1: Never use water as a first response. Natural fibers absorb moisture instantly, and water can spread the stain, dissolve natural dyes, or create water rings that are worse than the original stain.
Safe cleaning methods (in order of escalation)
- Dry-cleaning sponge — a chemical-free, vulcanized rubber sponge that lifts dust, soot and light marks by absorption. Available at hardware stores. Use gentle, sweeping motions — don't scrub.
- Soft vacuum brush — use the lowest suction setting with a soft bristle attachment. Good for dust and loose debris in the weave.
- Eraser (white, non-abrasive) — a clean white art eraser can lift pencil marks and light smudges. Use very light pressure.
- Barely-damp cloth — last resort only. Dampen (not wet) a white cloth and blot (not rub) the stain. Test in an inconspicuous area first. Works only on non-absorbent surface stains.
Stains that cannot be removed
- Adhesive stains — dried paste on natural fibers is permanent
- Grease / oil stains — absorbed into the fibers irreversibly
- Ink stains — penetrates the fiber structure
- Water rings — caused by moisture dissolving natural dyes; the ring is a permanent tide mark
For permanent stains in visible areas, the only solution is panel replacement with matching material.
How Do You Handle Pet Damage?
Cat scratching and dog chewing are common causes of grasscloth damage. The repair approach depends on severity:
- Light scratching (surface only): If the fibers are frayed but not torn through, try gently pressing them back down with a soft cloth and a tiny amount of seam adhesive. The texture will partially mask the damage.
- Deep scratching / tearing: Use the patch technique described above. Cut along the weave lines for the best blend.
- Large areas of destruction: Replace the entire strip. This requires matching material from the same dye lot.
Prevention: Consider applying grasscloth only above a chair rail or wainscoting in homes with pets. This protects the lower 90 cm (36″) where most pet damage occurs.
When Should You Call a Professional?
- Damage spans more than one strip — multi-panel repairs require professional alignment
- The material is reflective (mica, gold foil, glass bead) — these materials show every repair imperfection
- You don't have matching spare material — a professional may be able to source a close match
- The damage involves corners or obstacles — matching seams around corners requires experience
- Water damage is extensive — may indicate a wall moisture problem that needs to be addressed before repair
Frequently Asked Questions
Can I use a magic eraser on grasscloth?
No. Magic erasers (melamine foam) are mildly abrasive. They will scrape away the natural fiber texture and leave a visible smooth patch that's worse than the original stain. Use a dry-cleaning sponge instead.
How much spare material should I keep?
Keep at least one full strip (the height of your tallest wall) from the same dye lot. Store it rolled (not folded) in a cool, dry place away from sunlight. This gives you enough material for patch repairs or a full panel replacement if needed.
Can faded grasscloth be restored?
No. Fading from UV exposure changes the fiber color permanently. The only fix is panel replacement. To prevent fading, use UV-filtering window treatments in rooms with direct sunlight on grasscloth walls.
Related Guides
Installation Guide
Full 7-step installation process.
Handle Seams
Minimize seam visibility.
Best Adhesive
Choosing the right paste.
Wall Preparation
How to prep walls properly.
DIY vs Professional
When to hire a pro.
Grasscloth Guide
Complete grasscloth reference.
Need Repair Material?
If you need matching replacement material for a repair, contact us with your original order details and we'll help you find a dye-lot match.
Contact Us