Installation Guide
How to Handle Grasscloth Seams
Visible seams are a natural characteristic of handwoven wallcovering — not a defect. But you can minimize their appearance dramatically with the right prep, technique and finishing touches. Here's how.
Key Takeaways
- Seams are a feature — they confirm the material is genuinely handwoven, not printed.
- Tint your primer to match the wallcovering color — prevents white wall from flashing through gaps.
- Color panel edges with a matching marker or crayon before hanging.
- Reverse hang — rotate every other strip 180° to blend shading differences.
- Alternate rolls (1-2-3-1-2-3) to distribute natural color variation.
- Plan seam placement — keep seams away from the center of focal walls.
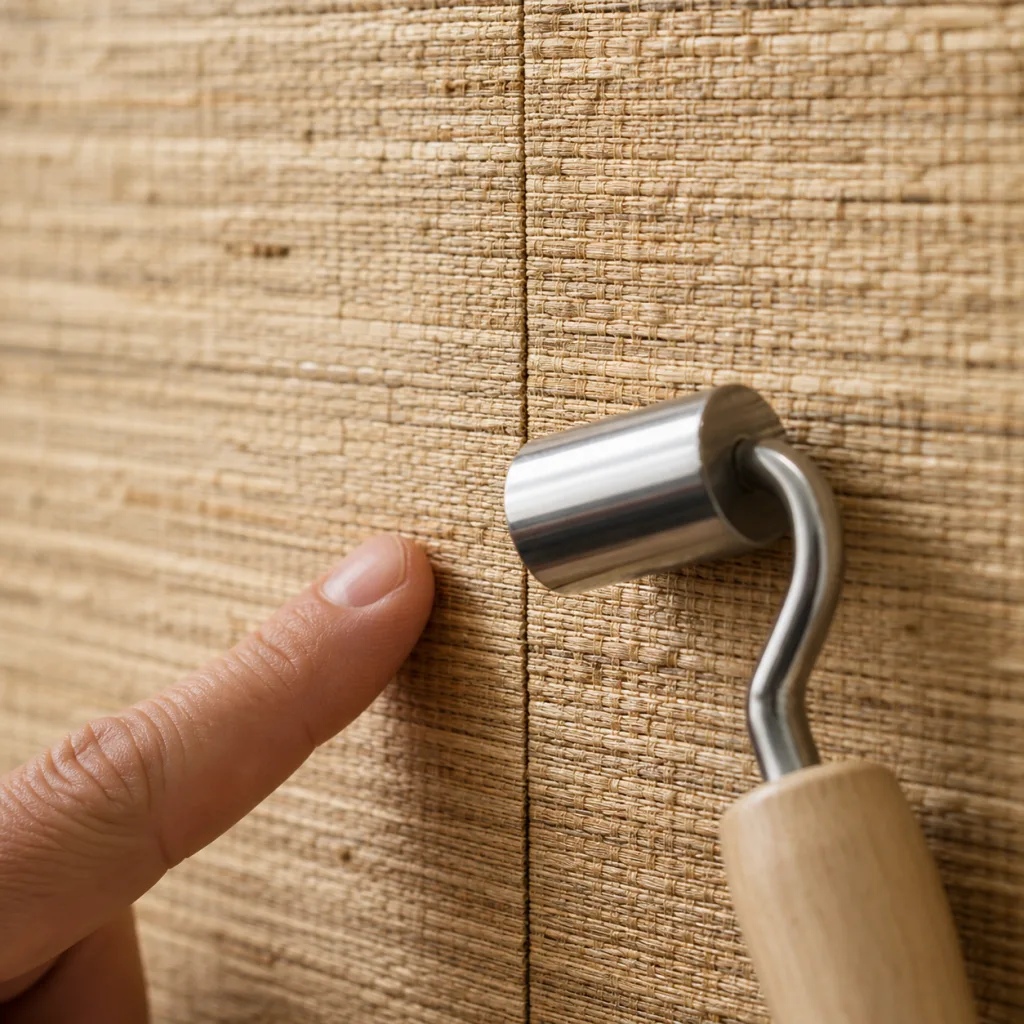
- Never use a seam roller — it crushes fibers and creates worse visible marks than the seam itself.
Why Are Grasscloth Seams Visible?
Grasscloth is hand-woven from natural plant fibers — jute, seagrass, sisal, or arrowroot — on a paper or non-woven backing. Because each roll is woven individually, the fiber density, color tone and weave pattern vary subtly from strip to strip. When two strips meet on the wall, this variation creates a visible junction — the seam.
This is fundamentally different from printed wallpaper, which is machine-manufactured with perfect color uniformity. With natural wallcovering, the seam is proof of authenticity. Designers and specifiers who understand grasscloth view seams as a mark of genuine craftsmanship — similar to the grain variation in natural wood.
How Do You Minimize Seam Visibility?
While seams can never be eliminated entirely, professional installers use a combination of techniques that make them dramatically less noticeable:
1. Tint Your Primer
This is the single most effective technique. If your wall is white, any tiny gap at a seam — even 0.5 mm — creates a bright white line that the eye immediately detects against the darker wallcovering.
- Tint your wallcovering primer (e.g., Roman PRO-977) to match the background color of the grasscloth
- For extra precision, paint vertical bands on the wall exactly where seams will fall, matching the wallcovering color
- Even a close color match (not perfect) dramatically reduces seam visibility
2. Color the Panel Edges
The raw edge of the wallcovering backing is typically white paper. When two strips butt together, this white edge can peek through.
- Before hanging, use a watercolor marker or wax crayon matching the grasscloth color to gently color the white backing edge
- Apply to both edges of each strip
- Be careful not to get marker on the fiber face — test on a scrap piece first
3. Reverse Hang (Railroading)
Natural wallcovering rolls often have slight shading variation from one edge to the other (the "selvage effect"). This creates a noticeable color shift at seams where the dark edge of one strip meets the light edge of the next.
- Rotate every other strip 180° — hang strip 1 top-to-bottom, strip 2 bottom-to-top, strip 3 top-to-bottom
- This pairs similar-shade edges together, blending the transition
- Check manufacturer instructions first — some patterned wallcoverings cannot be reversed
4. Alternate Rolls
Different rolls from the same dye lot can have slight color variation — this is inherent to natural fiber dyeing. Using one roll at a time creates visible color banding where rolls change.
- Cut strips from 3+ rolls simultaneously, cycling through them: Roll A strip 1, Roll B strip 1, Roll C strip 1, Roll A strip 2...
- This distributes variation evenly across the wall
5. Plan Seam Placement
- Start from the most visible corner or focal point and work outward
- Avoid placing seams at the exact center of a feature wall — offset slightly
- Align seams with architectural features (door frames, light fixtures) where possible — this makes them appear intentional
- Avoid thin slivers — if the last strip would be less than half-width, adjust your starting position
What Seam Technique Should You Use?
| Technique | Method | Best For |
|---|---|---|
| Butt Seam | Strips placed edge-to-edge, no overlap | Most natural wallcoverings (standard method) |
| Double Cut | Strips overlapped, cut through both layers, excess removed | Premium installations requiring tightest possible seam |
| Wire Edge | Factory-trimmed precision edges | High-end grasscloth with pre-trimmed edges |
Butt seam is the standard method for most natural wallcoverings. Double cutting produces the tightest seam but requires a very sharp blade and experienced hands — cutting too deep can score the wall beneath.
What Should You Never Do at Seams?
- Never use a seam roller — it crushes the natural fibers at the seam edge, creating permanent flat, shiny marks that are more visible than the seam itself
- Never overlap seams — overlapped natural wallcovering creates a visible ridge and shadow line
- Never force edges together — stretching fibers to close a gap will cause them to spring back after drying, creating a worse gap
- Never apply adhesive to the seam face — paste on the fiber surface causes permanent staining
How Do You Fix Visible Seams After Installation?
If seams are more visible than expected after drying:
- Fine-tip watercolor marker: Gently touch up the visible gap with a matching marker. Immediately wipe any color that gets on the fiber face with a barely-damp cloth.
- Seam adhesive: If an edge has lifted, apply a tiny amount of wallcovering seam adhesive with a small brush. Press gently with a damp sponge — never a roller.
- Lighting adjustment: Strong side-lighting (wall washers) dramatically highlights seams. Consider switching to overhead or diffused lighting to soften their appearance.
Frequently Asked Questions
Are grasscloth seams a defect?
No. Visible seams are a natural characteristic of handwoven wallcovering — they confirm the material is genuine, not printed. All natural wallcovering manufacturers acknowledge seams as inherent to the product. They are a mark of authenticity valued by designers.
Which grasscloth types show seams the least?
Basket-weave and paper-weave grasscloth styles disguise seams better than traditional sisal, jute or arrowroot. Darker colors also hide seams more effectively than lighter shades. If seam visibility is a primary concern, request samples of tighter-weave options.
Can I make grasscloth seams completely invisible?
No. Complete invisibility is not possible with genuine natural wallcovering. However, with tinted primer, edge coloring, reverse hanging and careful placement, seams can be reduced to a subtle, barely-noticeable line that adds character rather than distraction.
Related Guides
Installation Guide
Full 7-step installation process.
Installation Mistakes
7 errors that ruin installations.
Wall Preparation
How to prep walls for natural wallcovering.
Grasscloth Guide
Complete grasscloth reference.
Grasscloth vs Faux
Real vs imitation compared.
Natural vs Synthetic
Plant-based vs manufactured.
See the Weave Up Close
Request grasscloth samples to see how seams look with different weave styles and colors in your own lighting.
Request Samples