Installation Guide
Installing Wallcovering Around Corners & Outlets
Corners, outlets and switches are where most natural wallcovering installations go wrong. Natural fibers don't bend, stretch or reposition like vinyl — here's how professionals handle every tricky spot.
Key Takeaways
- Never wrap corners — natural fibers are stiff and will crease or tear.
- Inside corners: Extend 5–10 mm past the corner, then overlap with a new strip.
- Outside corners: Wrap 25 mm maximum, or butt-joint with a fresh strip.
- Double-cut in corners for the cleanest seam (optional, advanced).
- Turn off power before cutting around outlets and switches.
- Cut an X from center outward — never cut from the edge inward.
- Change blades every 2–3 cuts — dull blades fray natural fibers.
Why Are Corners Difficult with Natural Wallcovering?
Natural wallcoverings — grasscloth, sisal, jute, cork — are stiffer and less flexible than vinyl or non-woven wallpapers. Vinyl can stretch and slide into corners smoothly; natural fibers resist bending and will crease, buckle or tear when forced around a 90° angle.
Additionally, walls are rarely perfectly square. Even a 2–3 mm deviation from plumb at the corner means the wallcovering will fan out or pinch, creating an uneven line. The professional solution is to always break the strip at the corner and re-establish plumb on the adjacent wall.
How Do You Handle Inside Corners?
Inside corners (where two walls meet inward) are the most common corner type. Here's the professional method:
- Measure the distance from the last full strip to the corner at three points (top, middle, bottom)
- Cut the strip to the widest measurement plus 5–10 mm
- Hang the strip, smoothing it into the corner and wrapping the 5–10 mm onto the adjacent wall
- Score the backing lightly at the corner crease with a blunt tool (not a blade) to help it sit flat — sisal fibers are especially resistant to bending
- Start the next strip on the adjacent wall, overlapping the wrapped edge
- Re-establish plumb — use a laser level or plumb bob to mark a true vertical line for the new strip, since the corner itself is likely not perfectly plumb
Advanced technique — double cutting: For the cleanest possible seam, overlap the two strips by 10–15 mm in the corner, then cut through both layers with a fresh blade. Remove the excess from both strips to create a perfect butt joint. This requires a very sharp blade and careful pressure — cutting too deep will score the wall.
How Do You Handle Outside Corners?
Outside corners (where two walls meet outward, like a column or window reveal) are trickier because the wallcovering must wrap around an exposed edge:
- Option A — Minimal wrap: Extend the strip 25 mm (1 inch) maximum around the outside corner onto the adjacent wall. Start the next strip from the corner, overlapping the wrapped edge. This works for most grasscloth and sisal.
- Option B — Butt joint at the edge: End the strip exactly at the corner edge and start a fresh strip on the adjacent wall. This avoids any wrapping but creates a visible seam at the corner.
- Option C — Corner molding: Install a matching wood or metal trim over the corner to hide the junction. This is the most forgiving method and is common in commercial installations.
Material note: Cork wallcovering (2–4 mm thick) is too rigid to wrap around outside corners at all — always use a butt joint or trim. Gold foil should also never be wrapped — the metal leaf will crack at the bend.
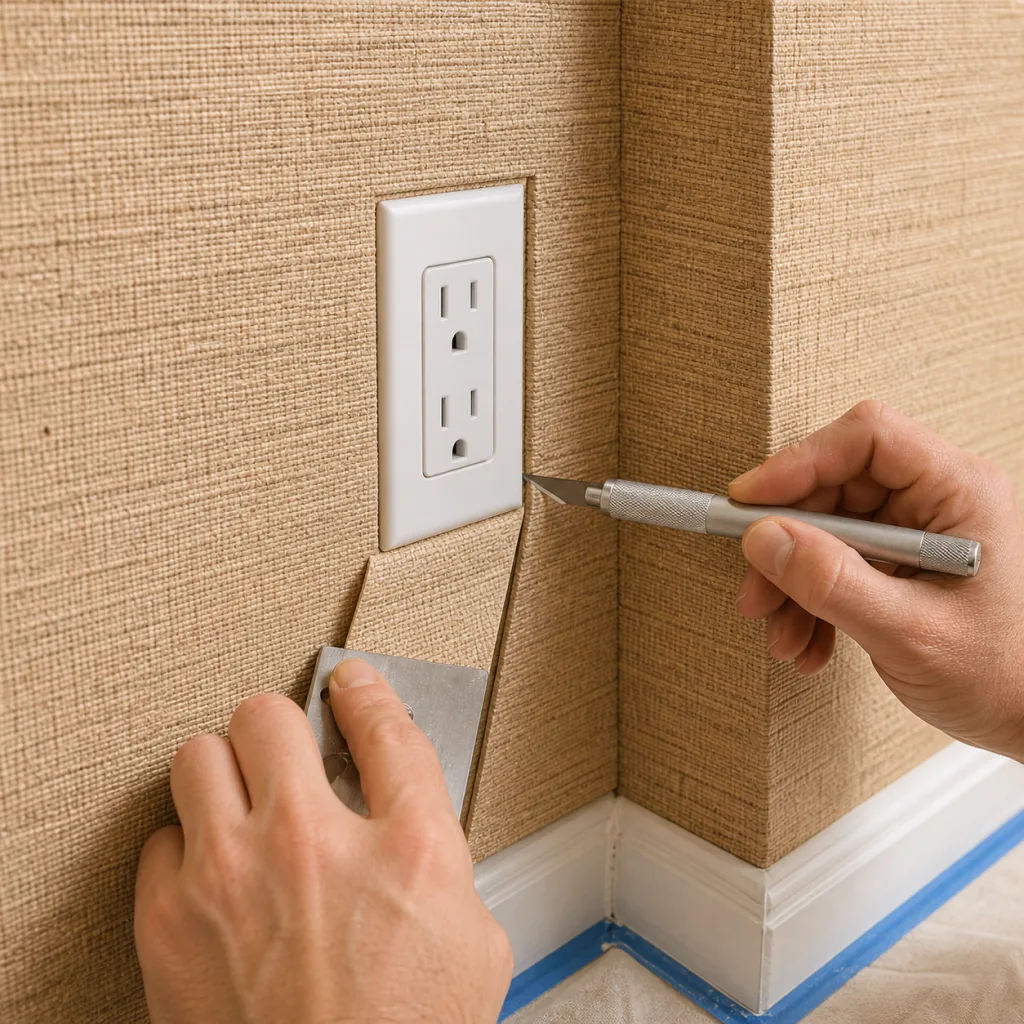
How Do You Cut Around Outlets and Switches?
⚠️ Safety first: Turn off power at the circuit breaker before starting.
- Remove cover plates — unscrew and set aside all outlet and switch cover plates before hanging
- Hang the strip over the box — position the wallcovering strip directly over the electrical box as if it weren't there
- Feel for the box edges — gently press the wallcovering against the wall to locate the outline of the electrical box behind it
- Cut an X from center outward — using sharp scissors (not a blade, which can damage the outlet), cut a diagonal X from the center of the box to each corner
- Trim the flaps — cut each triangular flap, leaving approximately 6–12 mm (¼–½ inch) of excess beyond the box edge
- Tuck the flaps — smooth the excess material against the inside edge of the electrical box so it sits behind the cover plate
- Reinstall cover plates — wait until the adhesive is fully dry (24 hours), then screw the cover plates back on
How Do You Handle Windows and Door Frames?
- Windows: Hang the strip past the window opening. Cut horizontally at the top and bottom of the window frame to create a flap. Smooth the wallcovering against the wall above and below the window, then trim the flap to fit the reveal.
- Doors: Hang the strip past the door frame. Make a diagonal relief cut from the edge of the strip toward the top corner of the door frame. Smooth the wallcovering against the wall above the door, then trim along the frame edge.
- Window reveals: If the window has a deep reveal (recessed frame), you may need a separate strip to cover the reveal depth. Match the grain direction to the main wall for visual continuity.
Quick Reference: Corner & Obstacle Techniques
| Obstacle | Technique | Key Rule |
|---|---|---|
| Inside corner | Split strip, wrap 5–10 mm | Re-establish plumb on adjacent wall |
| Outside corner | Wrap 25 mm max or butt joint | Use trim for cork / gold foil |
| Outlet / switch | X-cut from center, tuck flaps | Power off at breaker first |
| Window | Horizontal cuts at top/bottom | Separate strip for deep reveals |
| Door frame | Diagonal relief cut at top corner | Trim along frame with fresh blade |
| Ceiling line | Score and snap with sharp blade | Change blade every 2–3 cuts |
Frequently Asked Questions
Can I wrap grasscloth around a corner in one piece?
No. Natural fibers are too stiff to bend cleanly around a 90° corner. The material will crease, buckle or tear. Always split the strip at the corner and start a fresh piece on the adjacent wall.
Do I need to turn off power when cutting around outlets?
Yes, always. Even with scissors, cutting near live wires is a safety hazard. Turn off the circuit at the breaker and confirm power is off with a voltage tester before cutting around any electrical box.
What if my corners aren't perfectly square?
Most corners aren't. That's exactly why you should never try to wrap a continuous strip around the corner. By splitting the strip and re-establishing plumb on the adjacent wall, you accommodate the corner deviation without visible distortion.
Related Guides
Installation Guide
Full 7-step installation process.
Installation Mistakes
7 errors that ruin installations.
Wall Preparation
How to prep walls for natural wallcovering.
Handle Seams
Minimize seam visibility.
Grasscloth Guide
Complete grasscloth reference.
How to Specify
Writing wallcovering specifications.
Need Installation Support?
We provide detailed installation instructions with every order, including material-specific notes for corners and obstacles.
Contact Us